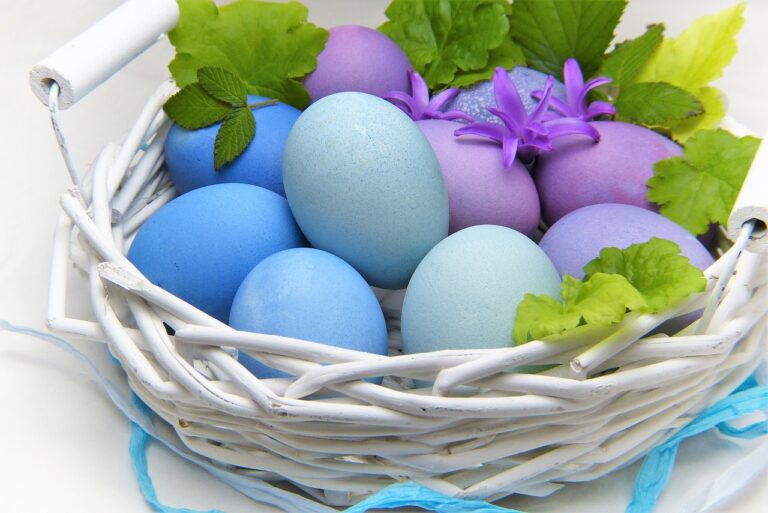
Homemade Gift Ideas
Posted by admin on
February 2, 2010

In giving gifts, there is the option to buy or not. The latter would probably be your choice if you do not have the exact funds to spend. When this is your concern, and you still wouldn’t want to arrive at your loved ones’ place empty-handed, then, making homemade gift ideas would be a better option.
With homemade gift ideas, you can actually stretch your imagination and create the perfect gift for the receiver.
But what types of homemade gift ideas should you fill your thoughts with? Among the numerous homemade gift ideas, what can make someone else’s day better and brighter?
Here are a few options:
Making an Interesting Treasure Stone
You probably have had those days in childhood when you would just merely play with clay and form it into different things that you can play with. This simple project is a little like that.
For this, you should have a cup of flour, a cup of used coffee grinds, a half cup of salt, one fourth cup of sand, and a cup of water.
To proceed with making your very own treasure stone to give to family and friends, mix all the dry ingredients first. Then, add water. Do not pour at once. Add water slowly so you can check the consistency of the flour.
Remember that you need to make the flour a bit stiff not runny.
Then, knead the dough until it becomes smooth to touch. And break into pieces.
The fun part here is to add some wonderful surprises inside the dough before you let it dry for at least three to four days.
Once it hardens, it is ready to give. You may need to tell the receiver to break it with a hammer to see what is inside.
Making a Helpful Stress Ball
Everybody gets stressed – in one way or another. And during those times, it is best to relax and unwind. If you know someone who needs to take a break from it all, a stress ball is a perfect homemade gift to give.
To make this, prepare a small round balloon. Inflate it to about four to five inches.
Don’t tie the end. Rather, pinch the top of the balloon about an inch from the balloon’s hole. Fill it with cornstarch.
Then, slowly remove your fingers from the top to help the cornstarch slide into the interior of the balloon.
Add more cornstarch. Basically, you may need to fill it to approximately three inches.
Now, you need to pull the opening of the balloon and remove the extra air by pinching that area.
Then, you have to tie the balloon – making sure that it is a bit close to the cornstarch.
Decorate your balloon.
Making a Picture Frame
To make this, you need a construction paper, cd case, glue or hot glue gun, and stickers or other items for decorating the frame.
To start, cut the construction paper into squares. You better make sure that these squares can actually fit a cd case.
From those squares, cut another square in their center, and paste a photo of the receiver there.
Glue the sides with a glue or glue gun.
Stick the square you made in the cd case – preferable on the inside. Close and glue the edges.
You can now decorate your picture frame with stickers, glitter, or any other items you like.
These simple homemade gift ideas are sure to bring a smile to anyone who would receive them. Whatever you choose to give, the loving effort that you put in these three choices of homemade gift ideas will be able to show how much you really care.
Homemade Halloween Costumes
Posted by admin on
February 2, 2010

If you’re going to the party but don’t have anything to wear, these homemade Halloween costumes should help. You can use these costumes or make them templates for other clothing designs.
Creepy Old Man
Required Tools and Materials
Torn clothes
Makeup
Tin cup
Safety pins
Wig
Small rocks or coins
Instructions
Make sure the clothes are old and ragged for full effect. Put them on and make a few more tears. Put the safety pins on so it doesn’t completely fall apart. Apply some dirt and grime on the knees, stomach and neck area. You can use paint, dirt or both.
Put dark makeup on your face. Put black marks around the eyes and the mouth. You can also put thin black marks across your cheek so they appear to crack. Put the finishing touches to this homemade Halloween costume by donning a dirty wig. Carry the can with the rocks (or coins). Walk with a stick and the getup is complete.
The Birdcage Look
Required Tools and Materials
Sweatshirt with green hood
Sweatpants (brown)
Hay
Leaves
Glue and glue gun
Craft wire
Eggs
Instructions
Put glue on the leaves and press them to the sweatshirt. Put some on the hood as well. You can use a stocking cap if you don’t have a hood. Draw some dark lines on the sweatpants to make it look rugged and rough. Gather the raffia or hay. Assemble them to look like a
bird’s nest.
Finish this homemade Halloween costume by putting glue on the nest. Connect it to the shoulder or the hood. Add some eggs or synthetic bird to the nest. Optionally, you can add a branch to the nest using glue.
The Jelly Bean Dude
Required Tools and Materials
Several colored balloons
Cellophane wrap
Colored ribbons
Instructions
Put on tights and bodysuit, both white. Blow some balloon so they’re about the size of jelly beans. Use the cellophane to create a bag around the suit.
Put the balloon around it. Scatter the balloons around. Secure the ribbon on your neck. Get a piece of cardboard. Write something like “Jelly Belly Dude” or “Mr. Jelly Bean”. Put the “bag” sign on the bag. This homemade Halloween costume is finished.
Note; if you don’t want to use a cellophane, get a garbage bag. To keep the letter in place, use sticky notes or something similar. Also try using safety pins when attaching the balloons. It will keep them in place.
The Ladies’ Man
Required Tools and Materials
Safety pins
Some dolls
Pastel colored clothes
Instructions
Put your shirt on. Write “ladies’ man”, “chick boy” or something similar. Put the safety pins and attach the dolls all over your shirt and pants. For girls, you can use male dolls or action figures. Write down “boy toy” on your shirt. You can also wear a
cap or hood. You can attach dolls there.
These homemade Halloween costumes are cheap and take only a few minutes to make. Try these out and amaze your friends with your creativity.
Homemade Valentine Gifts
Posted by admin on
January 31, 2010

There are many ways to make one smile during Valentine’s Day. Giving a bunch of flowers and chocolates are the most usual ways. But there’s another way that might interest you and make the receiver feel really special. The way to make one smile even bigger is to learn how to make homemade valentine gifts for those people you love and care about.
As such, homemade valentine gifts can be given to your mom, dad, relatives, daughter, son, teacher, friend, or anyone. The nicest thing about this type of gift is that you are the one who created those homemade valentine gifts that you would be giving. That absolutely makes it extra special for the receiver.
But what kind of homemade valentine gifts should you make for your loved ones? How will you know what homemade valentine gifts would be perfect? And, another question that may bug you is: What if you don’t even know how to make any kind of homemade valentine gifts? What now?
That last question may have probably worried you the most. But don’t worry. Here are two homemade valentine gifts ideas that you’ll be happy to give.
A Picture of Your Loved One
Everyone likes collecting pictures. So, why not give them a handmade picture magnet? Just be sure that you have a picture of the receiver so you can use that for the magnet.
To make this, cut out a heart from a white poster board. You can also choose to use another shape to cut out aside from a heart. In the middle of the board, cut out a smaller-sized heart. This is to help the picture show through.
Now, trace the bigger heart on the board and cut it out. This is for the back of the magnet frame.
Decorate the heart frame. Use different paints or colored pens.
Slide in the picture and close it with glue.
The last thing to do is to place a self-adhesive magnet strip at the back portion of the frame. And you’re done!
A Handmade Canvas Bag
Another neat gift idea is to make a handmade canvas bag for your loved one.
Shop around at craft stores for a blank canvas bag to use for this project. Don’t forget to choose different colors of paint brushes, fabric paint, ribbons or other small decorative items that you can use for your bag.
This can get a little messy to do so it is best to lay out some old newspapers on the floor before you start.
Then, start painting the bag with the colors that you have chosen. When the paint is dry, you can decorate it with the ribbons and other items that you purchased earlier. Stick them on the bag with a glue gun. And the bag is ready to be given!
These neat and easy-to-do homemade valentine gifts would truly put a smile on the faces of your loved ones. So the next time this occasion comes around, opt to create your own gifts to celebrate the day and you’ll see that it will be more special for you and those whom you would give the handmade gifts to.
Homemade Christmas Gift Ideas
Posted by admin on
January 31, 2010
Christmas day refers to an annual holiday when people celebrate Jesus of Nazareth’s birth. One of the most awaited events associated with the celebration is gift giving. People give gifts as a way of showing their love and appreciation to their families, relatives and friends. If you are in tight budget and you want to give away cheap but useful gifts, you can try some of the most popular homemade Christmas gift ideas featured below.
Hand Colored Candles
For this special project, the materials that you will use include a dull pencil, a permanent marker and pillar candles. In addition to these materials, you need a watercolor brush, acrylic paints, cotton swabs and rubbing alcohol. Etch different styles into the candles with the use of the pencil. Make sure that you etch the styles and designs gently. Get the watercolor brush and brush paint in the designs. To make the candles more attractive, you can use various colors of acrylic paints. If you want to erase any spot in the wax, dip the swabs in the alcohol and use these to remove unnecessary lines and designs.
Decorative Doorstop
To do the project, you will need a newspaper, a brick with holes, scissors, felt paper and tacky glue. Aside from these, you can use a modeling clay, miniature decorations, craft wire and toothpicks. Cover a table with newspaper. The table will be your working place. Place the brick on the table. Measure the bottom of the brick. Cut the felt paper based on the brick’s measurement. Use the modeling clay to cover the brick’s holes. Fill the brick with the miniature decorations. You can use craft wire and toothpicks to hold the decorations.
Fun Felt Pen
To make the pens, you will use a ballpoint pen, a felt paper, scissors, glue and googly eyes. Place the pen on the felt paper. Cut the paper from the bottom to the portion below the tip of the pen. Roll it to the right and glue the felt to the other side of the pen. Do the same thing to glue the other side of the pen. Attach the eyes at the bottom part of the pen. To make the pen more attractive, you can make ears and wings with the use of excess felt. Attach the other parts to the pen.
Giving gifts on Christmas Day need not to be expensive. Just a little of imagination and creativity, you can easily give interesting, useful and attractive homemade Christmas gifts to your loved ones and friends.
Homemade Holiday GiftsHomemade
Posted by admin on
January 24, 2010
The true spirit of the holiday can be captured perfectly through giving someone you love a homemade holiday gift. Not only are they inexpensive but they also express the creative part of your self. This will enable the recipient to really know the real you and make them feel how much you really care for and love them.
Sew Up Squares
This is a great homemade holiday gift that your kids and their friends can enjoy with. Just sew some square beanbags by hand or in your sewing machine. Made two five-inch squares on a fabric and cut it out. Sew the three sides of the squares with the right sides of the fabric facing each other. Turn the bag right-side out then poke out the corners using a pencil. Pour in some dried beans or rice and sew by hand the last side of the square. Make a nice juggling set for the children by tying up together three beanbags with a ribbon. If you are giving this homemade holiday gift to some adults, then replace the beans with fragrant herbs like mint or chamomile.
Personalized Brooches
These brooches when worn by a family member will give them the excuse to talk about the person that their brooch represented. The materials needed for this homemade holiday gift are bottle caps, needle-nose pliers, pin backing, clear glaze or white glue, nail polish, glitters, and photo.
Bend out and flatten the bottle cap rim using the needle-nose pliers and glue a pin backing on it. Decorate the edge of the cap with nail polish and glue some glitters on it. Trace a quarter around the person’s face on the photo and cut it out. Glue the cut out picture in the center of the cap and coat it with white glue that dries clear or with a clear glaze.
Hand-Painted Mugs
Turning plain mugs into personalized ones is also a great idea for homemade holiday gifts. You will need a pencil and paper, Pebeo Porcelain 150 glaze, cotton swabs or watercolor brush, and ceramic mugs.
Practice drawing your personal design on a piece of paper before painting it on the mug. When you’re ready to do it, lay the mug on its side and put some glaze on it using the brush or cotton swab. Let it stand for about 24 hours for the painted mug to air dry. Bake the mug for about 35 minutes in a preheated 325 degree oven to set the glaze.
To have a special touch on this homemade holiday gift, put in the mug a package of hot chocolate mix or some assorted tea bags.
